


XenServer Management on Steroids with SCVMM 2012 Part 2

Welcome back! In Part 1 we discussed the reasoning behind seeking out our steroids for XenServer and the installation of the SCVMM Integration pack. In Part 2 I’m going to discuss how to add your XenServer host’s to SCVMM.
Digging into the workout – Let the fun begin!
*Before we can touch on our two main topics (delegation of administration/Host affinity rules) mentioned in Part 1, we will need to add the XenServer host’s to SCVMM. I’m not going to cover how to install SCVMM as there are already plenty of articles out there on how to do so. The rest of this article assumes you have a working SCVMM installation in place. *
Here are a few of the Installation Blogs:
Adding your XenServer host’s to SCVMM.
Before we can add our XenServer host’s to the SCVMM environment there are a few tasks that need to be taken care of. Below I will outline all steps required to adding a XenServer host to your existing SCVMM 2012 environment.
Creating the Run As account
1. First up, we’ll need to create a run as account which will be used by SCVMM to communicate with the hosts. As you can see Figure 10 our first step is to click the Settings option which is on the left viewing pane. This will bring us to the SCVMM settings section.
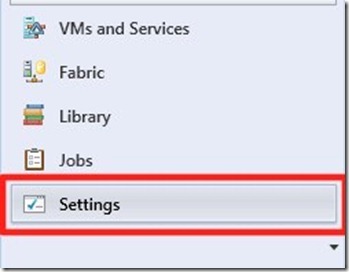
Figure 10 – Creating a Run As Account.
2. Once we are in the settings section, you will see at the top of the screen the option to “Create Run As Account” which is shown in Figure 11 click this to open up the Run As dialog box.
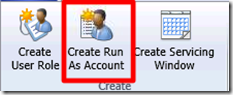
Figure 11 – Creating a Run As Account.
3. When the dialog box launches enter the credentials to access your XenServer Console. The credentials required would require full admin. In this Lab Environment I chose to roll with the root account. In production you might chose to go with a separate local account, or an Active Directory account if your host’s are bound to AD. Take special note to the “Validate domain credentials” check box in Figure 12 If your using a local account you will want to uncheck this. If it’s domain based than you would want to have your credentials validated. Once the dialog is filled out click the “OK” button to proceed.

Figure 12 – Creating a Run As Account.
To Secure or not to secure… That is the question…
If you are planning on utilizing secure communications with your XenServer host it is a requirement to import your host certificates into your trusted people store on your SCVMM Server. I’ve outlined the steps below for this. I would recommend that you use secure communication, and proceed with the required steps below. If your not planning to use secure communication you can skip ahead to joining the hosts a few steps down.
1. If it doesn’t already exist, create DNS entries for your XenServer Hosts.
2. Using your browser connect to the FQDN of each of your XenServer hosts. You should get a warning about the website’s security certificate. Click continue to this website.
3. Click the Certificate Error in the Security Status bar and select View certificates. This is shown in Figure 13 below.
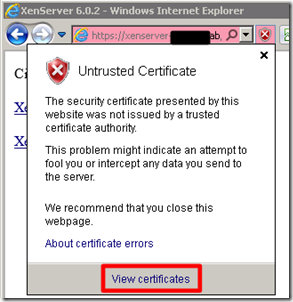
Figure 13– Importing XenServer Host Certificate
4. Make sure the FQDN on the certificate matches the FQDN of the XenServer host your connecting to. If it matches click “Install Certificate” as seen in Figure 14 below.
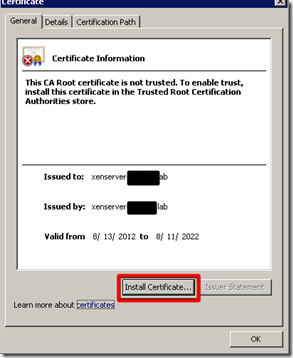
Figure 14– Importing XenServer Host Certificate
4. When the Certificate import Wizard comes up select “Place all certificates in the following store” than click Browse. This will bring up the “Select Certificate Store” dialog. Navigate to “Trusted People” than select “Local Computer” Make sure “Show physical stores” is selected, than press OK. Select Next on the “Certificate Import Wizard” to proceed. Each of these screens is shown in Figure 15 below.

Figure 15– Importing XenServer Host Certificate
5. At last! you are just about done, just verify the Certificate Store selected by user section showed “Trusted People \ Local Computer”. As seen in Figure 16 Click Finish to proceed.
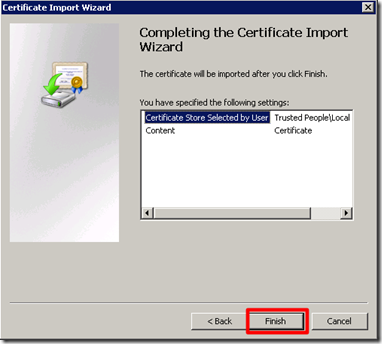
Figure 16– Importing XenServer Host Certificate
6. You should be prompted letting you know the import was successful. This dialog is seen below as Figure 17. Click OK to continue.
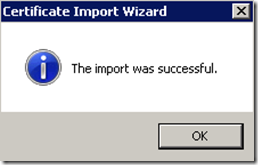
Figure 17– Importing XenServer Host Certificate
7. At this point to verify that all is well, close your browser and reopen it. You should not be prompted with a certificate warning.
Adding your XenServer Hosts
1. Click the VMs and Services section seen in Figure 18 to proceed with adding your XenServer host’s to SCVMM.
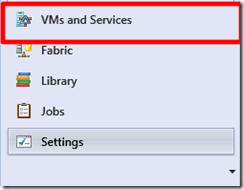
Figure 18– Adding XenServer host’s to SCVMM
2. Once in the VMs and services section you will see “Clouds” and “All Hosts” at this point you can create a new folder or Host Group for your hosts, or just right click “All Hosts” and select “Add Citrix XenServer Hosts and Clusters” as seen in Figure 19 below.

Figure 19– Adding XenServer host’s to SCVMM
3. Under “Computer Name” section Enter you XenServer FQDN or IP depending on how you want to manage your XenServers in SCVMM. As you can see in Figure 20 I chose FQDN. Notice the check box for “Use certificates to communicate with this host.” This goes back to my question above, if your going to roll with unsecure communication uncheck this box, otherwise check it. Click “Browse” under the Run As Account section.

Figure 20– Adding XenServer host’s to SCVMM
4. Make sure to select the account which you created previously in the creating “Creating a Run As Account” section above than click OK. Figure 21 contains a screen shot of your previously created Run As account.
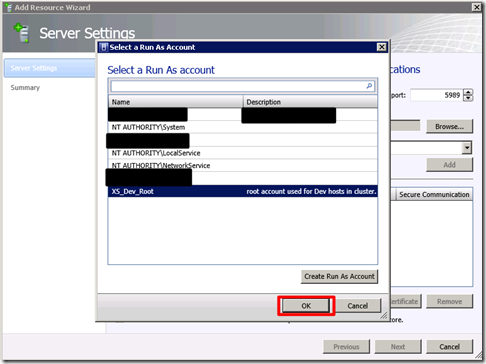
Figure 21– Adding XenServer host’s to SCVMM
5. Now that your “Computer Name” and “Run As Account” are selected, chose your “Host Group” which you would like to add your hosts to than click “Add”. Figure 22 show’s a screen shot of this.
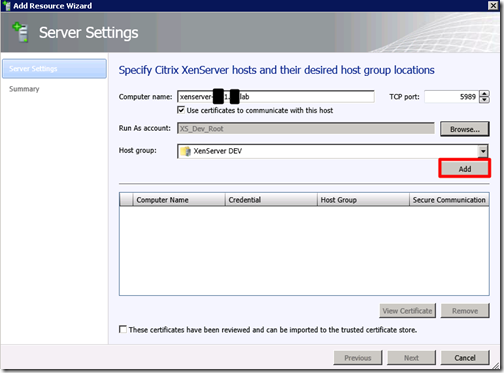
Figure 22– Adding XenServer host’s to SCVMM
6. Sorry in advance for tattooing Figure 23 but I thought it was important to make a few notes. Take a min and read them. You will notice below that if your in a cluster configuration, All host’s in the cluster will be added. Check to make sure your hosts are listed. It’s important that all pre-req’s noted above are completed on all host’s in the cluster. Otherwise you will have failed host’s which can’t communicate with SCVMM. Also Make sure if using secure communication the check box is checked for importing certificates into the trusted store.

Figure 23– Adding XenServer host’s to SCVMM
7. As you can see in Figure 24’s Summary dialog this is where you confirm adding of the “Computers”. What’s interesting here is for Computers to be added, we only see one, and that’s the cluster name. It would have been nice, if they allowed you to see the host’s included in the cluster here. Click “Finish” and take a stretching break, maybe get a cup of coffee. Depending on the number of host’s it will take a bit to add them into SCVMM. You can verify the status of each host under the “JOBS” section under the SCVMM Home tab.

Figure 24– Adding XenServer host’s to SCVMM
8. Once your host’s are added as seen in Figure 25 you will see your XenServer pool name as the “Cluster” in SCVMM, and under it are all of your hosts. If any host’s are missing review the ”Jobs” section to dig into why they might have failed.

Figure 25– Adding XenServer host’s to SCVMM
That’s it for Part 2. Now that your XenServer host’s are added to SCVMM we can dig into Part 3 – Creating your Private Cloud – Delegation of Administration. As always, feel free to comment and make suggestions. I look forward to your feedback!
, and XenApp/XenDesktop 5, 6, 6.5, and 7.x!")


Hi there,
I’m currently struggling with adding XenServer 6.1 to VMM 2012 SP1 RU2 running on WS 2012. It always fails.
I’ve noticed that there is always problem with untrusted CA certificate. It is issued by our local AD CA and is valid inside the OS (CA is distributed as trusted root by GroupPolicy).
I also tried to manually import the CA certificate to every meaningful store on the server for local machine, local user, and SCVMM services as well, to no avail. When I click on ‘View Certificate’ it always says that the CA is not trusted and I suppose that’s why it fails to add the server.
Any idea what to try next?
Thank You very much!