


Integration, Implementation and Performance Guide for Unidesk for vSphere with Atlantis HyperScale and USX! Featuring XenDesktop and AppSense

As mentioned in a previous blog post, May 2015 Atlantis Computing released an integrated hardware/software Hyper-Converged Infrastructure platform called HyperScale. As a refresher for those not as familiar with Atlantis, here’s a high level overview of their current three platforms (ILIO, USX, and HyperScale):

Since HyperScale launched I’ve had many customers and colleagues inquire about cross product integration with other End User Computing software solutions including Unidesk, View/XenDesktop, AppSense/RES, and others. This post will focus primarily on Atlantis and Unidesk integration, notably the thought leaders for layering technologies as we know them today. If you’re not familiar with Unidesk, here’s a quick overview:

At first glance this seemed like a perfectly natural fit as Atlantis has traditionally been positioned to address storage performance and capacity issues most common in persistent and non-persistent virtual desktop environments. With Unidesk’s unique approach to desktop layering, they are well positioned to address Persistent Virtual Desktops requiring User Installed Applications (UIA) or Department Installed Applications (DIA) using a robust desktop management platform today. Additionally, this approach extends to enable a gradual transition to Non-Persistent over time as applications are moved from UIA/DIA thick or automated installs (SCCM, Altiris, Landesk) into IT delivered apps using Unidesk Application Layers. For more information on Unidesk, visit their website www.unidesk.com.
Atlantis’ ILIO and USX capability to use Server DRAM as primary storage is an excellent fit for non-persistent virtual desktop or Remote Desktop Session Host (RDSH) environments. Combining USX or HyperScale with local flash (SSD) storage, provides an amazing platform for persistent or non-persistent virtual desktops alike. While this blog post is focused on the integration of Unidesk for vSphere with Atlantis HyperScale, many of the concepts, leading practices, and recommendations can be applied to Unidesk with ILIO or USX for customers that prefer to customize their own server hardware configurations or use alternate volume types. Finally, I will be integrating Unidesk with my Citrix XenDesktop environment with NetScaler and StoreFront 3.0 to provide the connection broker functionality.
See the previous blog post for details on the hardware/software specs of Atlantis HyperScale. In my environment each host has a single 10GbE network connection, and multiple 1GbE network connections for management. I suspect storage and network performance for HyperScale/USX could be even higher with dual 10GbE, but this provides a good representation of performance under failure (down path, down switch, network, etc.).
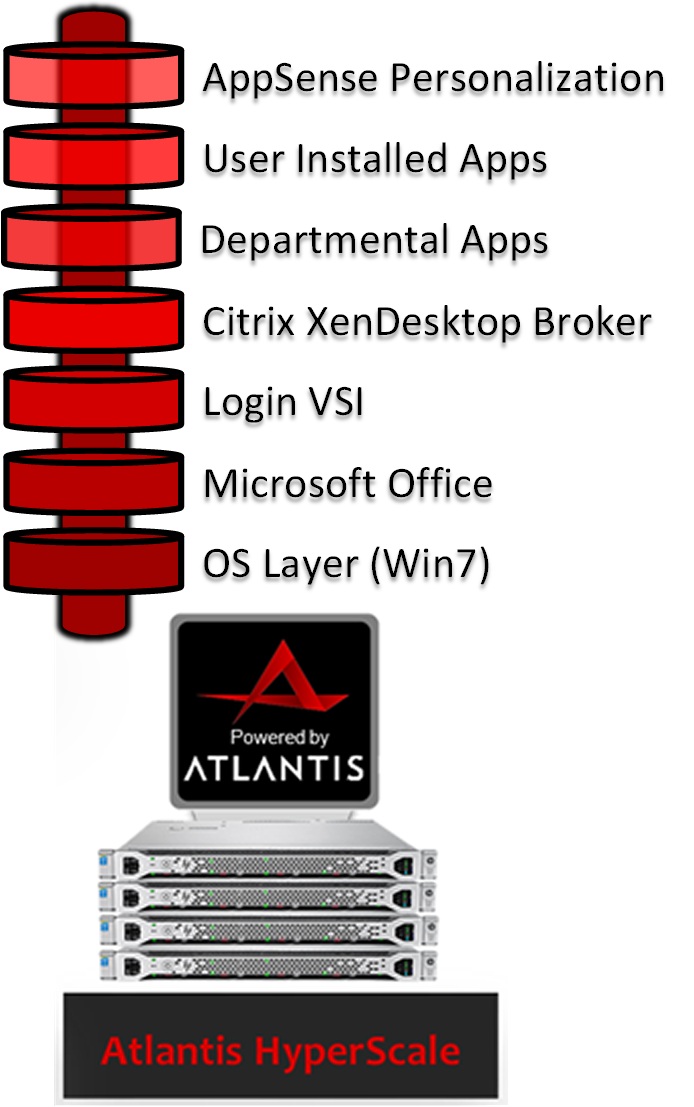
Here’s a visual of what the final solution will look like once we’re done. Let’s get started!
To start, I have a freshly deployed Atlantis HyperScale 4-node cluster using HP DL360 Gen9 servers, joined to an existing VMware vCenter server:

I’ve downloaded the latest version of Unidesk for vSphere (2.9.3 at the time of writing). Next, I’ll run UnideskInstaller.exe and click Next:

Accept terms & conditions:

Select Install Now and click Next:

Since I already have the full package downloaded, I’ll select use a package and click Next:

Simple install:

I’ll use the FQDN of my vCenter server and a Unidesk Service Account that I created with Full Administrative privileges:

I’ll select my appropriate Datacenter, VM folder, Host, and Storage for deployment of the Management Appliance:

I’ll enter the Management Appliance name, network switch to use and a Static IP Address, Subnet, Gateway and DNS.
Note: For this deployment I’ll need about 10 consecutive IP addresses for Unidesk, so I’ve selected a range that is not in use by other devices. Planning out the IP address range ahead of time is useful to ensure all Unidesk CachePoints are consecutively addressed. More on that later…

Similar configuration for the CachePoint Template and Master CachePoint:

Review and start installation:

Exit:

Navigate an Internet Explorer browser to the IP Address of the Management Appliance. If you don’t already have Silverlight installed, you’ll be prompted to install. Login with Administrator / Unidesk1 for the username and password:

Review the steps and Close:

Next, I’ll review the Unidesk VMs and Templates that were deployed and create a clean Win7 VM to import into a new OS Layer (VMUNIWIN7-M):

To create the clean and patched Win7 VM, I followed Unidesk’s guide here:
This involves six high-level steps that can optionally be automated using Microsoft Deployment Toolkit or similar Operating System Deployment tools:
- STEP 1: Set up a Windows 7 gold image on a virtual machine
- STEP 2: Mount or copy the Unidesk Tools onto the gold image
- STEP 3: Create an answer file for unattended installation on Unidesk desktops
- STEP 4: Optimize the gold image for the Unidesk environment and create a VMware snapshot
- STEP 5: Create a VMware snapshot of the gold image
- STEP 6: Install the Unidesk software onto the gold image
Note: If you want to reuse an existing Win7 VM from a previous deployment, re-register the VM with the Management Appliance using a Run as Administrator Command Prompt and the following command:
“C:\Program Files\Unidesk\Etc\importwsclient.exe” FQDN.DOMAIN.COM
Be sure to configure a DNS record for the new Management Appliance or use the IP Address:

Once the Gold Image is ready, go to Layers -> OS Layers in the management console. Select Create OS Layer:

Name the layer and select the Gold Image from the drop down. If the Gold Image isn’t listed, run the command mentioned above to register it:

Select one of the default icons or import a new image to use for this OS Layer:

Create Layer:

After about 10-15 minutes, the OS Layer will be ready to use. While we wait, we can configure a couple other pieces of the infrastructure.
XenDesktop Broker Integration
The process to integrate with Citrix XenDesktop is outlined in detail in the following guide:
There are three main steps to this process:
- Install the Unidesk Virtual Desktop Connection Broker Agent on delivery controller(s)
- Create a Catalog and Delivery Group for Random desktops (non-persistent)
- Create a Catalog and Delivery Group for Static desktops (persistent)
Once done, I’ll configure the Management Appliance under System -> Settings and Configuration:

Next, I’ll create a couple Installation Machines that will be used to create the various Application Layers or update the OS Layers. Navigate to System -> Installation Machines and select Create Installation Machine:

Since Unidesk uses single core, multiple socket VM configurations, I would recommend these be created with just a single CPU Socket so the OS Layer HAL doesn’t become altered. I’ll create four identical Installation Machines so I can multi-task and create multiple Application Layers simultaneously:

Create Installation Machine:

Rinse and repeat until four installation machines have been created:

Navigate to Layers -> OS Layers. As soon as the Win7 Gold Image is ‘Deployable’ I can start creating Application Layers:

Under Layers -> Application Layers, I’ll select Create Layer:

For my initial environment, I’m going to create four application layers as follows:
-
AppSense CCA and EM
- I’ll be using AppSense Environment Manager to provide User Environment Management and personalization to both persistent and non-persistent virtual desktops.
-
Citrix XenDesktop VDA
- I’ll install the VDA to integrate with the Connection Broker as configured in Unidesk Settings
-
Login VSI
- I’ll be doing some scalability and performance benchmarking against the environment. The Login VSI layer will include a couple other applications including Adobe Reader, Flash, Doro PDF, Java, etc.
-
Microsoft Office 2013
- I’ll configure this layer as a 20GB Layer Size to ensure there’s enough space for installation on ongoing Microsoft patches
Layers will be similarly configured (with exception for Microsoft Office which needs 20GB). Here are some sample steps for the layer creation process.
Layer Details:

OS Layer:

Prerequisite Layers:

Icon assignment (browse to a custom icon file):

Create Layer:

Rinse and repeat until each of the initial Application Layers have been created:

In the background, Unidesk prepares the Installation Machines for the layering process. To install the applications into the App Layer, you can either use the VMware vSphere console and connect to each Installation Machine, or use the Open Console option in the Actions tab (personally I prefer to use a vSphere Console to the Installation Machines):

If you choose to multi-task and install applications to multiple layers like this, don’t lose track of which machine is connected to which layer! If you lose track, you can top open the tasks window in the bottom to view the task:

This indicates that the W7 Login VSI layer is attached to VMUNIWIN7-IM4 (See above).
Installation of nearly all applications are exactly as you would expect for a native installation. If an application requires multiple reboots, I’d recommend you perform those prior to finalizing. An example would be Microsoft Office which currently downloads the entire internet as part of the Windows Update process. Multiple reboots are required there, just keep doing them until Windows Update shows up to date!
AppSense Common Communications Agent and Environment Manager Layer
For the AppSense CCA & EM layer, based on my experience I install both the Common Communications Agent (CCA) and Environment Manager (EM) agent into the Application Layer. This prevents the AppSense Management Console from trying to push down the agents every time the machine reboots. Policies will be pushed down for each agent, but that’s generally a very quick process. The agents typically require a reboot for installation. If you’re intending to use Application Manager or Performance Manager, I’d recommend those agents go into a Unidesk Application Layer as well. Additionally, the ForceFullPathOnImageLoad registry key should be set, either in the Application Layer or through Policy. See: http://blog.appsense.com/2014/04/appsense-desktopnow-and-unidesk-virtual-desktop-management/

Citrix XenDesktop Layer
For the Citrix XenDesktop VDA installation, two important steps are documented in the guide here: http://www.unidesk.com/support/learn/2.9.3_for_vSphere/deploy/integrate_with_a_broker/deploy_broker_xen_integrate
While it seems unintuitive, the VDA should be installed using the Remote PC option. Since MCS/PVS will not be used, this tells XenDesktop not to try to manage the VDA as a master/gold image. This is the same process that would be used for blade PCs or other physical machines:

The Unidesk guide recommends not to run the OS Optimizer as the Gold Image was already optimized by Unidesk, but I disagree with this recommendation. Particularly if defaults were selected when using Unidesk’s optimizer. If anything, I would recommend two Application Layers for the Citrix XenDesktop VDA: One for Persistent Unidesk desktops, and one for Non-persistent Unidesk desktops. The OS Optimizer is VERY useful for non-persistent Unidesk desktops, even when the Unidesk desktop optimizations were run. The default Unidesk optimizer does not disable several key services that create a lot of background work for non-persistent desktops.
For more details see: http://support.citrix.com/article/CTX125874:

Finalizing Layers and Get Ready to Deploy
As each of the installations into Application Layers are completed, go back to the Unidesk console and select Finalize from the Actions pane:

Once all layers have been finalized and show as Deployable, we’ll get ready to deploy some desktops!

First, we need to create two templates. One for XenDesktop Persistent (Existing Static), one for XenDesktop Non-Persistent (Existing Random). Navigate to Layers -> Templates. Click Create Template.
Template details:

OS Assignment:

Application Assignment (I’ll select the application layers as we deploy desktops):

Desktop Type and Policy:

Desktop Settings:

Icon Assignment:

Click Create Template to finalize the process. Repeat the above process to create a Template for W7 Persistent desktops:

Finally, a bit of scaling recommendations before deployment. Currently Unidesk throttles most concurrent operations to four (4) operations per CachePoint. The most time consuming operation is what Unidesk calls a BIC or Re-BIC (Boot Image Creation). CachePoints also determine placement of Boot, OS, and Application Layers across the VMware vSphere datastores. Atlantis HyperScale by default ships with three 1TB All-Flash Hyper-Converged Volumes. Together, the three volumes can provide a total of 12TB+ effective capacity (before deduplication):

Each of these volumes are capable of delivering 50,000+ IOPS (4KB, 80% random, 80% write) and 250MB/s+ throughput. Since these volumes are backed by incredibly fast performing local SSDs in the four nodes, we have quite a bit of performance capabilities to leverage. To make the most of the available performance and to minimize deployment, BIC, re-BIC and application layer deployment times, I’d highly recommend deploying three CachePoints per datastore, or a total of nine (9) across the HyperScale 4-node cluster. This recommendation is based on my testing to scale up to 500+ desktops per 4-node cluster, mileage may vary. Overhead for each additional CachePoint is minimal and the VMDKs are all de-duplicated by Atlantis, so you’re really not losing anything by scaling out the CachePoints in this manner.
Adjusting Infrastructure and Deploying Additional CachePoints
First, we need to adjust the infrastructure configuration. Go to System -> Manage Appliances. Select the Management Appliance and click Edit Properties:

On the Hosts and Storage section, make sure each Host in the cluster is selected, along with the three datastores (HS-DS-01, HS-DS-02, and HS-DS-03):

Review to make sure all hosts were properly selected, along with the respective three datastores. Update Management Appliance:

Under System -> Manage Appliances, select Create CachePoint:

Configuration:

Hosts:

Storage Tiers:
Note: If the first Management Appliance and Master CachePoint were created on HS-DS-01, add two additional CachePoints to this datastore. Then, add three more to each of the other two datastores:

Network (this is where that consecutive group of Static IP addresses comes in handy):

Confirm:

Rinse and repeat until a total of 10 appliances have been deployed (one Management Appliance, one Master CachePoint, and eight additional CachePoints):

Now the real fun begins! Once the OS Layer has been created and several Application Layers, we can start deploying non-persistent and persistent Desktops. The first time we deploy desktops, Unidesk will kick off the replication process for the layer VMDKs to ensure that all CachePoints deploying desktops have access to the OS and Application Layers. This is where we get to see the power of Atlantis HyperScale and All-Flash Hyper-Converged Infrastructure first hand. Let’s see what we can do…
Deploying 10 Non-Persistent Desktops
To start, I’ll deploy two groups of desktops, one persistent and one non-persistent. Both groups of desktops will have the application layers previously created and we’ll start with ten desktops in each. The persistent desktops will have 20GB for User Installed Applications. Select Desktops -> Create Desktop:

Template Selection:

User Assignment:

Desktop Details:

OS Assignment:

Application Assignment:

Desktop Settings:

Maintenance Schedule:

Confirm and Create Desktops:

Observing Performance Data during Deployment
Watching the tasks in the vSphere client, we can see that there’s quite a lot of Copy Disk operations that get kicked off to replicate the OS and Application Layers from the Master CachePoint to the additional CachePoints:

The USX Management Console shows us quite a bit of Analytics about these operations. I’ve highlighted on Network Throughput for HS-DS-01, the datastore that hosts the Management Appliance and Master CachePoint:

Wait a second, I read that correctly, right?!? An initial spike of 1.4 GigaBYTES per second of throughput? What! Inconceivable! Let’s double check in the vSphere client just to confirm…Sure enough, my eyes were not deceiving me, vSphere client confirms 1.3GB/s+ spike of throughput from the volume VM serving the HS-DS-01 datastore replicating the disks to the other volumes:

Receive rates on the other volume VMs confirms there’s quite a lot of traffic (~350MB/s) traversing the datastores during the CachePoint replication phase of deployment:

Looking at the throughput to the underlying Local_Flash / SSD datastores being aggregated by HyperScale/USX, we can see mostly read traffic (79MB/s+) and little write traffic (11MB/s+) hitting flash disks. Given the previous stats, this tells me that the Atlantis volume VMs are doing a great job of I/O offload:

Deploying 10 Persistent Desktops
Next, I’ll repeat the same process again, this time creating 10 Persistent desktops. For the persistent desktops, I’ll configure all settings identically to the non-persistent group except I expect the user resource requirements to be a little higher, so I’ll allocate 2 vCPUs and 4 GB RAM. Also, I’ll set the persistent disk size to 20GB as discussed previously. When configuring CPUs, be sure to select 1 CPU Socket with multiple Cores Per Socket for NUMA performance and HAL reasons.

After a couple more minutes, all 20 persistent and non-persistent desktops have been created and are ready for use:

Total deployment time was a brisk 14 minutes for non-persistent and 7 minutes for persistent:

Viewing these machines in Studio shows they have been successfully created and are registered, ready for use:

A quick peak at Programs and Features inside one of the desktops shows all applications as expected:

Additional Tuning and Optimizations:
While each template and group of desktops had Power Policy set to do not manage, the default Unidesk behavior is not what I would have expected. In fact, when the Unidesk Management Appliance triggers a logoff notification, it automatically triggers a reboot of the desktop. This can be a bit tricky if you expected this behavior to be controlled by XenDesktop ShutdownDesktopsAfterUse (See: CTX127842). To work around this, you can optionally set the DisableLogoffNotify registry key either in a layer or by policy. See: http://www.unidesk.com/support/kb/controlling-restart-behavior-nonpersistent-desktops
A quick single VM IOMeter test using one of the persistent desktops (2 vCPU / 4 GB RAM / 20 GB User Disk) shows the performance to be quite decent given all the filter drivers and layering in the mix:

A single VM with two disk workers is able to produce 23,000+ IOPS and 96MB/s throughput at .3ms read and write latency (4KB, 80% write, 80% random). I know a couple users that would be ecstatic with that performance.
DiskMark (part of PassMark PerformanceTest 8.0) scores are also amazing as to be expected:

For the final HyperScale/USX and the CachePoints test, the last step is to deploy a pool of 100 persistent desktops. Unfortunately this is the top end of my partner license at the moment, additional testing and scaling to 500+ desktops will require an updated license for testing purposes. I’ll follow the same steps I performed to create the initial 10 desktops.
While the desktops are being created, observing the task details shows 30+ simultaneous operations based on the number of CachePoints deployed. This is great!

Since all of the OS and Application layers were copied initially, network throughput for creating additional desktops is minimal in perspective, spiking and peaking to a mere 479MB/s at times (strong sarcasm, this is still smoking fast!).

More importantly, the existing desktops in the environment are still 100% usable during this time. Seeing new Unidesk desktop deployments at scale, I would be scared to death to do this during normal business hours with traditional storage and potentially even hybrid arrays! Using the same Iometer workload from the same VM as before, we can see slight degradation in performance during the deployment of 100 additional VMs:

As you can see, IOPS and throughput decreased, but still VERY good performance relative to other environments. Previously, IOPS were 23.5k, now they’re 20k. Throughput was 96MB/s, now 82MB/s. Latency is still pretty decent (not higher than .5ms). Most importantly, this desktop is still fully functional and not impacted by the Unidesk noisy neighbor affected created by deploying additional desktops. Do you have the same level of confidence in your current storage solution? J Change management constraints aside, I know many environments that are terrified to death simply to reboot desktop VMs during normal business hours.
Checking back in about 20 minutes, all 100 persistent desktops were created successfully:

Pretty impressive given the amount of hard work and heavy lifting that transpires in the Unidesk deployment process.
Preliminary Login VSI Testing Data:
As just a quick sneak peak, here’s some preliminary testing data against the 10 desktop persistent pool using Login VSI knowledge worker workload, AppSense Environment Manager for personalization, Citrix XenDesktop 7.6 VDA, and Microsoft Office 2013.
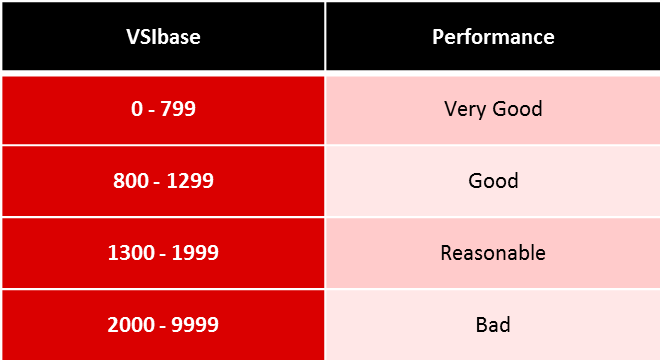
VSIbase: 790
VSImax v4.1 average: 789
VSImax v4.1 threshold: 1790
Stuck sessions: 0


From these preliminary numbers I can tell already that it’s going to be some pretty impressive testing results as a VSIbase of 790 is blazing fast performance! Here’s an overview of how Login VSI categorizes VSIbase results with performance:
If you haven’t already, go to http://www.atlantiscomputing.com/hyperscale and download the Reference Architectures for XenDesktop and Horizon View on vSphere with HyperScale, or click the images below:


In the View Reference Architecture, Atlantis demonstrated a VSIbase of 774 using Windows 7 Full Clone virtual machines, 2 vCPU / 2 GB RAM. Full Clones are undoubtedly the best performance achievable as there’s no imaging filter drivers getting between the VMs and storage. The fact that I was able to achieve a VSIbase of 790 with Unidesk and AppSense in the mix is truly remarkable!
Let’s put this baseline number into perspective from user experience point of view. while I was running the Login VSI tests, a quick stop watch sanity check showed login times were consistently 10 seconds or less from the first Citrix ICA client dialog to desktop ready state (Wallpaper and Start Menu visible).
Click the video below to see the 10 second login times for yourself (video speed has not been altered):
This is truly an incredible performance demonstrated by the combined hardware and software solutions. Let’s take a look at the storage capacity impact of combining Atlantis with Unidesk.
Storage Impact:
One of the key value propositions of Unidesk is their ability to cut down on storage for gold images, OS layers, and Application layers. I have to agree, this is pretty cool, opening up possibilities to use otherwise extremely expensive $$/GB storage hardware. Hopefully I’ve demonstrated throughout this deployment guide that Atlantis HyperScale and USX are more than up for the challenge, delivering some truly incredible performance results. But what about capacity?
Many of us know, if you allocate out 100 GB of space in a disk, whether thin provisioned or not, the dataset inside the disk will eventually grow to reach 100 GB in size. This is truly where deduplication, compression, thin provisioning, and other storage optimization techniques earn their weight in gold. Atlantis’ real-time inline deduplication ensures that as data is ingested, only the unique blocks and metadata are stored. For persistent desktops this benefits most for the User Installed Applications (UIA), Departmental Installed Applications (DIA) or general file and data storage. Don’t forget about those pesky page and swap files either! J
In my example, each persistent desktop was allocated 20 GB of storage to start. There are a number of indications on Unidesk forms that show that running out of capacity in a datastore or cluster supporting Unidesk can be a real pain in the rear. Based on my testing, I’m nearly 100% confident this wouldn’t happen with Atlantis HyperScale and the abundance of capacity. Atlantis will do a pretty good job of making sure that user data and layer changes over time stay in line, de-duplicating and thin provisioning real-time to reclaim any storage capacity possible.
Nevertheless, Unidesk makes a handy real-time Storage Report that can be retrieved from the actions pane of the Desktops section of the console. After deploying 10 non-persistent and 110 persistent desktops, here’s what my storage report looks like:

Pretty impressive! Unidesk assumes thin provisioning, so in my experience this number is a little low if you assume thick provisioning on VMFS and backend storage LUNs. Thanks Unidesk for saving my over 7TB of storage space! Let’s take a look at what Atlantis says.
Here’s HS-DS-01 (of 1TB total size, 914GB remains, so less than 90GB consumed):

HS-DS-01 vSphere view (5.48TB provisioned):

Here’s HS-DS-02 (of 1TB, 917GB remains, so less than 90GB consumed):

HS-DS-02 vSphere view (8.55TB provisioned):

Here’s HS-DS-03 (of 1TB, 941GB remains, so less than 60GB consumed):

HS-DS-03 vSphere view (8.43TB provisioned):

In short, Atlantis shows over 20TB of provisioned space (includes savings from thin provisioning and deduplication), while consuming less than 250GB of storage across all the CachePoints. Wow, truly remarkable. Atlantis further reduced the overall capacity requirement by providing de-duplication for Unidesk OS and Application layers, User layers, and VM files (page, swap, etc.). Obviously where Atlantis deduplication will shine is when we consider growth over time as unique and non-unique user and application data is transferred into the persistent desktops. Based on the information and testing data I’m seeing from initial deployment, I’d be hard pressed to think of any typical Unidesk customer selecting Atlantis HyperScale would ever run out of space. Another reason why All-Flash, when priced competitively, is the clear winner for End User Computing and Hyper-Converged Infrastructure deployments. Raw performance at a price you can afford, doesn’t break the piggy bank in the process of delivering mind blowing user experiences.
If nothing else, I suspect that existing Unidesk customers with known workloads would be able to use HyperScale as a reference architecture for a build-your-own hardware/software configuration optimized for USX. If done correctly, this could prove to be an opportunity to lower the entry point even further by reducing internal SSDs (currently 3x 400GB Intel SSDs per server in the CX-12) and USX capacity requirements where appropriate. This blog post should serve as a good reference for HyperScale, but it’s not to say custom hardware Bill Of Materials (BOMs) with USX results would be vastly different. I suspect results with build-your-own configurations would not be much different and would give customers opportunities to use alternate hardware configurations including denser compute hardware that typically has local storage constraints (High Performance Computing, Blades, etc.). Or, hardware platforms that allow the use of NVIDIA, AMD, or Intel Graphics Processing Units! While Unidesk doesn’t directly support GPUs/vGPUs through their user interface today, for Persistent desktops, drivers can be injected as an Application Layer and GPU/vGPU profiles can be attached via scripts. The options are truly endless.
Summary and Key Takeaways:
Overall the integration of Unidesk for vSphere with Atlantis HyperScale, including XenDesktop and AppSense, is fairly simple and straight forward. There are a couple of key findings and considerations as summarized below:
- AppSense Tuning for ForceFullPathOnImageLoad registry key, per http://blog.appsense.com/2014/04/appsense-desktopnow-and-unidesk-virtual-desktop-management/
- Citrix XenDesktop VDA configuration for Remote PC (physical or existing provisioned desktops) and OS Optimizer
- Use Unidesk DisableLogoffNotify registry key either in a layer or by policy to control Logoff/Restart behavior with XenDesktop ShutdownDesktopsAfterUse (See: CTX127842 and http://www.unidesk.com/support/kb/controlling-restart-behavior-nonpersistent-desktops)
- Scale and deployment of additional CachePoints to optimize storage capabilities, shorten deployment, BIC, and re-BIC times
- Observed network traffic during disk replication process from Master CachePoint to additional CachePoints is quite impressive!
- Excellent performance from a single Persistent desktop using 2 vCPU / 4GB RAM / 20GB Persistent user layer: 23,000+ IOPS, 96MB/s+ throughput @ .3ms read/write latency
- Fantastic PassMark PerformanceTest DiskMark scores, even considering layering and filter driver overhead
- Incredible VSIbase of 790, classified by Login VSI as Very Good performance!
- Citrix session login times consistently 10 seconds or less during the Login VSI session launch process
- Storage capacity reduction as expected given Atlantis’ inline deduplication and All-Flash characteristics
I hope you’ve enjoyed this blog post and that it serves as a reference for integration and implementation of Unidesk for vSphere with Atlantis HyperScale and USX!
If you have any comments, questions, or just want to leave feedback, please feel free to do so in the comments section below.
Thanks!
, and XenApp/XenDesktop 5, 6, 6.5, and 7.x!")


Thank you for detail explanation
QUESTIONS:
1. Am I correct to say I don’t need MCS or PVS anymore if I am using Unidesk
2. Do you have same article for AppVolume (I mean HyperScale+VMware AppVolume+Citrix XenDesktop)
tq
Hehe,
Dane, congrats for publishing this post.
This USX+Unidesk combination is the design I promote since almost a year and believe me, I’ve tried almost everything. Nothing will beat this combination anytime soon…
I call it VDI 2.0 🙂
Cheers!
That’s exactly the setup I want to try!
Very cool. Though, I may try out Hyper-V and RDS instead…maybe.
Great stuff. Thanks for sharing!
Dane this is a great post, very detailed and very helpful. Great Job!