


Free MDT Tools and PowerShell Scripts to Fully Automate the Deployment and Configuration of Hyper-V Server 2016, Failover Clustering, and Storage Spaces Direct for Hyper-Converged Infrastructure!

In the previous blog post I demonstrated how to build a proof of concept environment using Windows Server 2016 with Hyper-V and Storage Spaces Direct using virtual machines on VMware vSphere. Expanding on the concepts that I covered in the previous post, I’m going to show you how to fully automate the installation and configuration process using Microsoft’s free hypervisor and deployment software, namely Hyper-V Server 2016 and Microsoft Deployment Toolkit (MDT) 2013 Update 1. If you follow the steps in this post, at the end you will have a fully automated, entirely free Infrastructure-as-a-Service (IaaS) platform including shared storage using Hyper-V Server and Storage Spaces Direct. Additionally, you’ll have the tools to rinse and repeat as many times as required to deploy in remote pods of infrastructure, or to use for customer deployments if you work at an integration partner as I do.
If you’re not familiar with the free Hyper-V Server, it truly is feature rich, including all the features of Hyper-V, Failover Clustering capabilities, and now Storage Spaces Direct using a slightly modified build of Server Core with a customized administration GUI. With a little experimenting you could build a similar deployment process using Microsoft’s new Nano Server distribution to lower the install footprint and attack surface even further. At this stage there is no indication that Microsoft’s free hypervisor, Hyper-V Server 2016, will come with a Nano Server variation. Part of the objective of this blog post is to show a completely free infrastructure solution built using Microsoft’s free automation and deployment tool (MDT). Johan Arwidmark has an excellent blog post with instructions on how to use MDT to deploy Nano Server that can be used with some tweaking in combination with this post if you plan to use the licensed versions of Windows (Standard or Datacenter).
Introduction and Review of Deployment Objectives
Below you will find a quick overview of the environment I’m going to build in this blog post. To start, I need an Active Directory domain and an Administrator System running Windows Server 2016 TP4. These systems will sit outside the cluster we are building. On the Admin System we’ll install Microsoft Deployment Toolkit 2013 Update 1 and the Remote Server Administration Tools (RSAT) for Hyper-V and Failover Clustering. We need the Admin System OS version to match (2016 TP4) so we can use all the Storage Spaces features in Server Manager to view the storage pools and disks. We can use PowerShell remoting from that system to configure everything so we’ll never need to login to the Hyper-V servers once they’re deployed using MDT.

(Click to Enlarge)
The installation of Microsoft Deployment Toolkit 2013 Update 1 will be nearly identical to the steps I provided in my previous MDT blog post. If you want to integrate with Windows Deployment Services for network/PXE booting, you can follow the instructions in this previous WDS blog post. The only exception is that you need to grab Windows 10 Assessment and Deployment Kit (ADK) which can be found here: https://msdn.microsoft.com/en-us/windows/hardware/dn913721(v=vs.8.5).aspx. Also, you need to download MDT 2013 Update 1 from here: https://www.microsoft.com/en-us/download/details.aspx?id=48595. The blog post covered installation using ADK 8.1 and MDT 2013 (non Update 1).
Additionally, I noticed that the Share and NTFS permissions for the Deployment Share aren’t properly set when using MDT 2013u1 on Windows Server 2016. I’m not sure if Microsoft will fix this prior to GA or if there will be a new version of MDT that fully supports WS 2016. To remediate, right click the Deployment Share folder and make sure the MDT user account that you’re using for authentication has Full Control to the Share and at least Read and Execute NTFS permissions to the folder, subfolders, and files. You may need to replace all child object permissions if the deployment doesn’t work as expected.

Once the Deployment Share has been created and Bootstrap.ini and CustomSettings.ini have been configured, import the applicable drivers and hardware management agent installation binaries for the physical or virtual hardware that you’ll be deploying to. Most management tools, drivers, and agents for physical servers can be automated using command line parameters, which we can use as a custom Application deployment in MDT.
For example, HP Servers using Smart Update Manager (SUM). In the past I have silently installed SUM by creating two files. An _install.bat file with the following contents:
mkdir %systemroot%\Temp\HPSUM
xcopy “%~dp0*.*” %systemroot%\Temp\HPSUM
%systemroot%\Temp\HPSUM\hpsum.exe -silent -inputfile “%systemroot%\Temp\HPSUM\_input.txt”
exit 0
Along with an _input.txt file that has the parameters as called by the bat file:
BSMOPTIONS -FORCE=YES
Every once and a while HP changes the silent install process for SUM, but this has worked for a couple releases, so feel free to reuse it. To integrate with our MDT workflow, we’d simply create a new Application, copy the contents of the SUM ISO to the folder, and create the two scripts. Check all the paths to make sure you’re referencing the correct files and folders such as hpsum.exe. Depending on what hardware you’re using the management agents, drivers and firmware install process may be slightly different. Check the server manufacturer’s process for silently installing their tools as you’ll only have a simple CLI and PowerShell access once Hyper-V Server is deployed.
Importing Hyper-V Server 2016 image and Creating the Task Sequence
Next, we’ll import the Hyper-V Server 2016 WIM by mounting the Hyper-V Server 2016 TP4 ISO. In my example, Technical Preview 4’s file name was 10586.0.151029-1700.TH2_RELEASE_SERVERHYPERCORE_OEM_X64FRE_EN-US.iso. The latest version of the ISO can be obtained from this link: https://technet.microsoft.com/en-in/evalcenter/dn781245.aspx. Use the same process as described in my previous blog post for importing the Operating System WIM. When you’re done, your MDT console Operating System node should look similar to the following:

Next, we’ll create a Task Sequence to deploy Hyper-V Server 2016 TP4 that we will modify throughout this blog post. Right click Task Sequences and New Task Sequence. Provide a sequence ID and name and click Next:

Select Standard Server Task Sequence:

Select the Hyper-V OS:

Do not specify at this time:

Name and Organization:

Administrator Password:

Next:

Finish:

Next, we’ll create a custom MDT Wizard for capturing various variables that we need for deploying each node. Variables will include NetBIOS name, static IP info (address, mask, gateway, etc.), and domain join information. For multiple deployments in the same domain and network, we could use an MDT database to apply settings using different built-in parameters, making the deployment process touchless. However, creating a custom wizard allows us to make this install sequence portable to use MDT Media feature and build a custom ISO that can be used for bare-metal installs. I’ve shown a very similar setup in a previous blog post, but didn’t have an opportunity to provide step by step details on how I accomplished this. For a similar example using Windows Server 2012 R2 Hyper-V and deployment video, see: http://blog.itvce.com/2014/02/10/rapid-provisioning-windows-server-2012-r2-datacenter-hyper-v-hosts-using-microsoft-deployment-toolkit-mdt-part-1/
For this blog post, I’ll show you the basic framework for capturing and applying PowerShell parameters using MDT. Then you can modify this process to customize for your own environment.
Overview of Hyper-V Networking Topology and Objectives of Configuration Scripts
The sample wizard files and scripts I’m including below show a production ready scenario using six network adapters and multiple VLANs for Hyper-V Server 2016. Here’s an example of what the physical network topology of the Hyper-V host looks like:

First thing we need to do is create two files under the DeploymentShare\Scripts folder named DeployWiz_Hyper-V.xml and DeployWiz_Hyper-V.vbs. As a starting point, you can download and import my sample files, modifying as required:
Click to download DeployWiz_Hyper-V.xml and DeployWiz_Hyper-V.vbs
Be sure to unblock these files after copying to the Scripts folder:
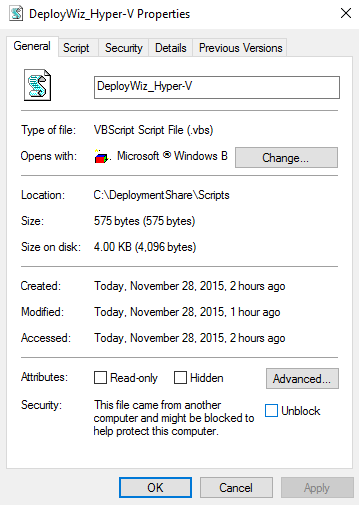
The XML file has all the Wizard field information to create the dialogs and input fields. The VBS file has some logic to validate the fields as you fill out the form fields. If you want to modify the wizard inputs, you can use the existing XML data fields as a reference, and copy the blocks of input field text, such as:
NIC1+2 Name or Description: <br>
<input type=text id=”NIC12Name” name=”NIC12Name” size=60 value=”Example:VLAN101_MGMT“>
<label class=ErrMsg For=NIC12Name>* Required (MISSING)</label><br>
If you want to capture additional parameters, be sure to update the descriptive text and ID references highlighted in red above. Additionally, you can remove or reorder these fields if your physical network topology is different. This wizard can be modified to capture additional parameters that you can apply using PowerShell, I’ll show you each of the steps below. The MDT parameter capturing capabilities are endless.
Next, we need to add a new Pane reference to DeployWiz_Definitions.xml in the same directory:
<Pane id=”Hyper-V” reference=”DeployWiz_Hyper-V.xml”>
<Condition><![CDATA[UCASE(Property(“SkipHyperV”))<>”YES” ]]></Condition>
</Pane>
This tells the MDT process to add a new dialog in the process to call our newly added DeployWiz_Hyper-V.xml wizard. I generally prefer to put this code near the bottom to find it quickly. Here’s an example showing the new Hyper-V Wizard being called between BitLocker and Credentials wizards:

If you’re using this MDT server for other task sequences, this Wizard can be skipped by specifying SkipHyperV=YES in the Bootstrap.ini or through the MDT Database.
Importing the Hyper-V PowerShell Configuration Script for MDT
Next, we need to create a PowerShell .PS1 file for installation and configuration under the DeploymentShare\Scripts folder named DeployWiz_Hyper-V_Step1.ps1. As a starting point, you can download and import my sample files, modifying as required:
Click to download DeployWiz_Hyper-V_Step1.ps1
Be sure to unblock this file after copying to the Scripts folder.
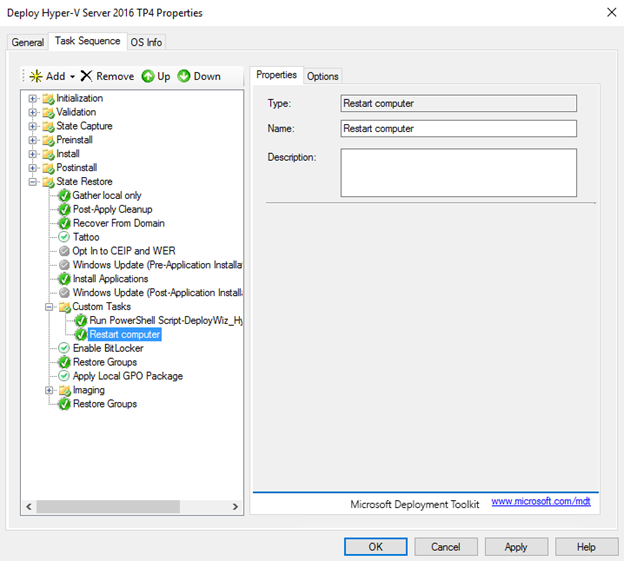
We’ll modify the Hyper-V deployment task sequence and add a new Run PowerShell Script action under Custom Tasks. For the PowerShell action, use the following for the PowerShell Script and Parameters:
Run PowerShell Script-DeployWiz_Hyper-V_Step1.ps1:
PowerShell Script:
%SCRIPTROOT%\DeployWiz_Hyper-V_Step1.ps1
Parameters:
-NIC12Name $TSEnv:NIC12Name -NIC12IP $TSEnv:NIC12IP -NIC12SM $TSEnv:NIC12SM -NIC12GWIP $TSEnv:NIC12GWIP -NIC12DNSIPs $TSEnv:NIC12DNSIPs -NIC34Name $TSEnv:NIC34Name -NIC34IP $TSEnv:NIC34IP -NIC34SM $TSEnv:NIC34SM -NIC56Name $TSEnv:NIC56Name

Additionally, I’d recommend inserting a Restart Computer task to finalize the installation and configuration process. It’s not recommended to reboot using the PowerShell script as this will cause the MDT task sequence to fail unexpectedly. Here’s what the Restart Computer task looks like:
If there are further PowerShell scripts or actions that need to be performed after a reboot, you could add a new Run PowerShell Script action here, using the same process I described for Step1 (call it Step2).
Optionally, if you want to Enable RDP on your Hyper-V hosts, you can add the following Run Command Line action between the PowerShell script and the Restart commands. Use the following Command Line:
powershell “set-ItemProperty -Path ‘HKLM:\System\CurrentControlSet\Control\Terminal Server’ -name ‘fDenyTSConnections’ -Value 0”
Here’s what the Task Sequence will look like:

Be sure to click Apply or OK to save the task sequence. Also, at this stage I’d recommend you update your Deployment Share by right clicking the root folder and selecting Update Deployment Share. This will generate updated LiteTouch media that can be used to mount to our physical or virtual machines for deployment.

Testing the Task Sequence Deployment
It’s usually easier to test out the deployment using virtual machines on VMware vSphere (Speeds up the time between reboots). You can reference my previous blog post for details on ensuring the VMX properties are set properly to install and run Hyper-V 2016 nested in vSphere 6.0. To test the Hyper-V PowerShell scripts with the six network adapters, I’ll add six virtual interfaces to each VM for the test, assigned in order based on the VLANs described above.
Note: If testing in VMware vSphere, it’s important to manually set the Mac Addresses, and make sure they are sequentially ordered, since the PowerShell script Sorts by the Mac Address. Here’s what one of my Hyper-V VMs on vSphere looks like, using Mac Addresses 00:50:56:80:62:01 – 00:50:56:80:62:06:

If your Mac Address order is different for the hosts you’re deploying to, you may need to alter the Wizard and PowerShell scripting logic. Feel free to leave a comment if you need assistance. For example, if you’re using rack-mount servers with Gigabit Onboard for Management and Cluster communications, and 10 Gigabit PCI-E for Virtual Machines.
Before deploying multiple VMs, I’ll test the Wizard logic and PowerShell script using a single virtual machine. To do this, I’ll attach the LiteTouch.iso to a VM and boot to CD-ROM.
If you have multiple, select the appropriate Task Sequence:

Here’s what the custom Wizard looks like, capturing all the necessary parameters for deployment:

Complete each of the fields in the form. Tab to advance to the next field and Click Next when every field has been completed. Note: There’s no fat finger field validation, so be sure to double check your inputs:

After a couple minutes, the server will reboot through install and you’ll see the customer PowerShell action progress:

Finally, the task sequence finishes the installation:

Reviewing the Test Deployment and Configuration Results
Reviewing the Hyper-V splash screen, we can validate a couple settings were applied correctly, such as Computer Name, Domain Membership, and RDP:

Typing “8” will show the network IP addresses:

If we want to see some of the advanced settings we need to move the dialog and find the Command Prompt running in the background. From the command prompt, we can launch PowerShell and run the ‘Get-NetLBFOTeam’ cmdlet:

If you want to validate any of the additional settings, you can run a couple of the following commands…
Get-NetAdapter | Sort-Object MacAddress

Get-NetLBFOTeamMember | fl Name,Team,AdministrativeMode

Get-NetIPAddress | fl InterfaceAlias,IPAddress

Alternative, we could run ipconfig /all:

Once all settings have been validated, exit and logoff of the Hyper-V host. Rinse and repeat this process until you have at least three Hyper-V hosts deployed (minimum before we can establish quorum and build the cluster).
Production Deployment of Three Hyper-V Server 2016 Hosts
To build the cluster and initialize Storage Spaces Direct, I’ll be using PowerShell remoting from the MDT Server (which is running Windows Server 2016). Each of my three hosts are configured identically with exception of the following:
Host Name: HVSRV16-01:
VLAN2_MGMT_IP: 172.16.2.131
VLAN3_Cluster_IP: 172.16.3.131

Host Name: HVSRV16-02:
VLAN2_MGMT_IP: 172.16.2.132
VLAN3_Cluster_IP: 172.16.3.132

Host Name: HVSRV16-03:
VLAN2_MGMT_IP: 172.16.2.133
VLAN3_Cluster_IP: 172.16.3.133

Click the video below to watch the automated deployment of all three nodes as virtual machines:
Preparing the MDT Server Admin System for PowerShell Script Execution to Create and Validate Cluster with Storage Spaces Direct
Next, we need to install the Remote Server Administration Tools (RSAT) for Hyper-V and Failover Clustering on our Administration System (MDT Server). From an elevated PowerShell prompt, we can run:
Add-WindowsFeature RSAT-Hyper-V-Tools
Add-WindowsFeature RSAT-Clustering
To build the cluster, I’ve created a PowerShell PS1 file with some variables that should be modified before being executed from the MDT server. As a starting point, you can download and import my sample files, modifying as required. Save the PS1 file as DeployWiz_Hyper-V_CreateCluster.ps1 to the DeploymentShare\Scripts folder.
Click to download DeployWiz_Hyper-V_CreateCluster.ps1
First, start by modifying the PS1 file and adjusting the Variables in the top section to match your environment.
Note: If you have more than three nodes, they can all be added to the cluster at the same time, just adjust the $ListOfNodes variable.
Below is a screenshot of the list of parameters specific to my first release of the script (Revision 1):

Click the video below to watch the execution of the PowerShell script using Failover Clustering and Storage Spaces Direct cmdlets.
Once all servers have been deployed and joined to the Failover Cluster and Storage Spaces Direct environment, you can use Server Manager, Failover Cluster Manager, and Hyper-V Manager installed on your MDT Administration System for remote management!
Creating MDT Media for a Portable Deployment using a Custom ISO
Now that our MDT Task Sequences are working precisely the way we want, we could easily create a MDT Media repository, which would allow us to make this deployment portable. Follow the steps below if you desire to create a portable ISO or USB drive for Hyper-V server deployments.
In the MDT console, expand Advanced Configuration, right click Media and select New Media.

Profile a path to the Media location:

Click Next:

Click Finish:

Next, we need to copy all settings from the Bootstrap.ini and CustomSettings.ini files. You can find these settings by right clicking the newly created Media location and going to Properties, then Rules. Optionally, you can just copy your Bootstrap.ini and CustomSettings.ini files from your DeploymentShare\Control folder to the new Media\Control folder.
Be sure to remove the DeployRoot, UserID, UserDomain, and UserPassword parameters from Bootstrap.ini as these aren’t needed for standalone media.
Once complete, update the Media by right clicking and selecting Update Media Content:

After a couple minutes, when completed, click Finish:

Inside the Media folder that was created, you will find a LiteTouchMedia.iso file:

This ISO file is now completely portable and can be attached to any physical or virtual servers without requiring access to the MDT server. To validate that the new LiteTouchMedia.iso is working properly without access to the MDT server, you can attach to a physical or virtual server that has all network adapters unplugged. If you see the Task Sequence selection screen with no network adapters plugged in, your MDT Media is working properly.

Summary
As a recap, in this blog post I’ve shown how you can fully automate the deployment of Hyper-V Server 2016 using Microsoft Deployment Toolkit and PowerShell. I’ve also shown you how to automatically configure the Failover Cluster and Storage Spaces Direct using the PowerShell script included. If you’ve followed this blog post, you’ve seen firsthand that you can truly have an enterprise class Infrastructure as a Service platform with shared storage and automated deployments leveraging completely free software. A huge thanks to Microsoft for continuing to innovate and drive value with their systems management products, making the hypervisor and storage absolutely commoditized. Of course, this blog post can be adapted to deploy Windows Server 2016 with Hyper-V as either Standard or Datacenter, should you require the Operating System Environments (OSEs).
I hope this blog post has been informative and useful as we get closer to Windows Server 2016 general availability! As always, if you want to leave feedback with any comments, questions, or concerns please feel free to do so in the section below! If this blog post has been useful to you, please tweet or share with your personal network.
Thanks!
, and XenApp/XenDesktop 5, 6, 6.5, and 7.x!")


Is anyone able to download the files from this page? All I get is a login to sharefile.com.
I have updated the ShareFile links, please let me know if you continue to have issues getting the files downloaded.
Thanks!
-@youngtech
Do you have an updated version of this blog:
– Server 2016
– Windows 10 1709
– MDT 8443
– Hyper-V 2016 (none-TP)
– XenDesktop 7.15
–
How to also auto deploy xenDesktop 7.15 with PVS WEM Profile-Manager Pool desktop to this environment?
Hi Dane,
Thank you for this great article. Do you have any updated on automate deployment Docker with Windows Container?